Spinach, Artichoke, and Goat Cheese Frittata

final

If you’re like me, whenever you pass by the monster size organic spinach container at Sam’s club your insides scream “THAT IS SO GOOD FOR ME, BUY IT BUY IT BUY IT” and then your mind kicks in and says “You don’t need that much BUT IT’S 4.98!! YOU CAN’T BUY EVEN CLOSE TO THAT AMOUNT AT THE GROCERY STORE FOR THAT PRICE!”, you end up with a large excess of spinach and you have to find new ways to use it for every meal.

Spinach

After having Amish-made pecan, cinnamon rolls for breakfast every day this week, I needed something a little healthier.  Of course, I had my excess of spinach to use.  I also had some leftover french bread (also a Sam’s club buy that is 2 loaves for under the price of 1 loaf anywhere else), frozen artichokes (tastier than canned), eggs and my all time favorite, goat cheese.

artichoke

I wasn’t planning on blogging about this because it was just a thrown together breakfast but it was sooo delicious that I had to share.

I started with a small baking dish. I cubed the left over bread and covered the bottom of the dish.  In a small bowl, I mixed together 3 eggs with about 3/4 cup of milk and some salt. I poured the egg mixture over the bread and let it all soak in. I dotted the top with goat cheese- maybe 1/4 of the small log. In a skillet, I melted 2 tbs (ok 3 tbs) and mixed in a half a pack of frozen artichokes and 3 big handfuls of spinach. Once wilted, I placed it in the baking dish on top of the other ingredients.  Bake at 375 for about 45 minutes or until it’s set in the middle and you have a wonderful breakfast!!!  It also keeps nicely in the refrigerator so you have breakfast for tomorrow too!

Notes:

  • I’m not sure if this is really a frittata because I’m not really sure what that means
  • I like this because it has eggs in it without being eggy.  The bread works wonders

The Best Steak You’ll Ever Have

Nothing frustrates me more than overcooked, under browned meat, especially when it comes to steak.  There is so much opportunity for greatness and with a few simple techniques mastered, you’ll never have an overcooked, gray steak again.

Here are some rules:

– With tender cuts of steak like Filet, the grill isn’t your friend.  Unless you have a really awesome one, it won’t get hot enough.  A cast iron skillet left at high heat for 6-8 minutes is your friend.

– Letting your meat come to room temperature and patting it dry with paper towels will ensure browning.

– Don’t go insane with seasoning. You want the seasoning to bring out the flavors in the steak instead of being the flavor. Salt and Pepper is all you need.

– Buy a quality steaks with good marbling.

– Once you put the steak in the blistering hot pan, don’t touch it.  It is searing and locking in all the juices, you moving it doesn’t help it.

– Let it rest for 10 minutes when it comes out of the pan.  It’s juices need time to redistribute.

I got these beauties at Reading Terminal Market in Philadelphia.  They have a nice butcher that will cut the meat how you like it.

IMG_0537

I order them 2 inches thick.  It allows the outside to brown and the inside stay rare.

Preheat your oven to 400 degree. Open a window and turn on the fan. Things are about to get smokey.

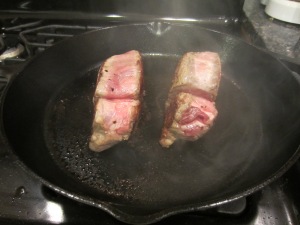
 Cast iron is important because it gets VERY hot and and it cook evenly.  Let is get SMOKING (literally) hot on high for about 6-8 minutes.  If you drop a little water in the pan, it should evaporate immediately.

While your pan is heating, pat your steaks dry with paper towels on every side.  If they aren’t dry, they will steam instead of brown.  Brush them lightly with vegetable oil. Liberally sprinkle with kosher salt and fresh cracked pepper on all sides.

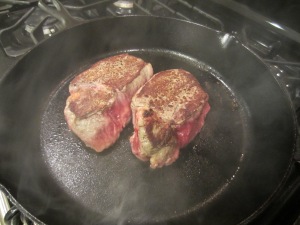
When your pan is hot (I’ve said this multiple times because it’s so important), place your steaks in and cook on each side for about 2 minutes each.

IMG_0541

IMG_0546

IMG_0545

Is your mouth watering yet?

Once you’ve seared them on each side, depending on their thickness they might be done.  Put a thermometer in the middle (from the side) and see the temp.  120 for rare and 125 for medium rare.  If they aren’t quite there yet, stick the skillet in your hot oven and let them cook a little more.  Check the temp OFTEN.  You don’t want them to overcook. They shouldn’t be in there more than 5 minutes.

When they are 120 degrees, place them on a plate and put a tablespoon of butter on top of each.  Cover tightly with foil.  Let them rest for 10 minutes.

Voila! Enjoy!

IMG_0550


Thanksgiving

I hate that this didn’t get posted before thanksgiving 😦  My computer had a hiccup and I didn’t get it up in time.  So keep this in mind for next year!

I’ve put A LOT of time, research, and thought into this year’s thanksgiving. I’m cooking for 11 which is a great number because you don’t have to make obscene quantities. A lot of magazines, websites, etc. have recommended picking only 3-4 sides but that just doesn’t seem right to me. Thanskgiving isn’t thanksgiving without all the good stuff.

Here’s the menu:

People are always freaking out about the turkey but that’s usually the easiest part. Buy a good, chemical-free turkey. We brine ours in Williams Sonoma turkey brine. The price tag is a little hefty but it’s worth it. Williams sonoma also sells brining bags that are great. We keep the turkey in an ice water cooler for 12 hours. Take it out and let it sit uncovered in the refrigerator for at least 8 hours. Rinse all the brine off and pat dry. Brush with oil and stuff with thyme, lemons, garlic, and onions. Then roast!  1 hour at 400 degrees and 1 hour at 325 degrees. 

Some highlights that I highly recommend for your thanksgiving meal:

  • Alton Brown’s Green Bean Casserole I love this recipe because it doesn’t use canned cream of mushroom. You make your own mushroom cream sauce which is much more flavorful. It can be assembled in advance and then popped in the oven until bubbly. He makes his own fried onions but using French’s fried onions from the can are much better.
  • Mac and Cheese This doesn’t usually come up as a traditional side at thanksgiving but it fits the thanksgiving mold pretty well (high fat and high carb). This is a grown up version of mac and cheese that is fabulous. It calls for 12 oz of gruyere and 8 oz of sharp cheddar but I switch he amounts around because gruyere is not only expensive but I like cheddar to be the more prominant taste. You can assemble ahead of time and then bake but do not bake and reheat.
  • Pumpkin Banana Mousse Tart I haven’t made this without getting amazing reviews. It can be made days ahead of time. Don’t worry about the banana- it’s only a subtle taste. It’s so much better than pumpkin pie for multiple reasons. Be careful with the removable bottom tart shell. Pick it up from the sides. I’ve picked it up supporting only the bottom and the whole thing fell through. Serve cold with extra whipped cream.
  • Pecan Pie with Whiskey Cream Sauce You’ll be licking the cream sauce off of your plate.

Perfect Roast Chicken

I’m so excited to blog about this chicken because it was the best chicken I’ve ever had.  The skin was crispy and the meat moist and flavorful.  It was perfect.  I started with the basis of Ina’s Perfect Roast Chicken recipe but made a few changes to ensure crisper skin. 

I started by rinsing my 5-6 pound chicken inside and out then patted it dry with paper towels.  Getting it dry is essential. If it isn’t dry then it will steam rather than brown.

I sprinkled the chicken’s insides with salt and pepper- be generous.  I then stuffed it’s behind with 2 lemons, cut in quarters, about 10 sprigs of time, and a head of garlic, cut horizontally.  All of these give off flavor while it’s roasting and infuse the chicken meat from inside.

This is where I differ from Ina- she says to butter the outside of the skin but I’ve found that while that does brown it, it doesn’t make it crispy.  I suggest cutting up 2 tbs of butter and gently loosening the breast skin and slipping the butter right between the skin and the meat.  This is where it will do the most good.  You can then press on the skin to spread out the butter a little more. Then brush the outside with olive oil and sprinkle with salt and pepper.

Cut up :
– 4 carrots in 2 inch chunks
– a bulb of fennel, quartered
–  1 large onion, thickly sliced
Toss them all in olive oil and salt and pepper.  Lay this on the bottom of your roasting dish. Spread out 10-15 sprigs of thyme on top. Then place the chicken in the dish.

Tuck the wings under the bird and tie the legs together.  I used these great silicone bands. They are just like rubber bands but can withstand 500 degrees.  I think they’re easier.

Roast this beautiful bird at 425 degrees for about an hour, depending on the size of your bird.  Test the temperature after an hour, you want the center of the breast to be 160 degrees and the leg/thigh to be 175.

This is the most important part of the whole recipe- LET IT REST. The juices need time to figure themselves out.  10-15 minutes should be sufficient.  If you are tempted to cut it open, take a look at this picture.  It shows how much juice is lost if you don’t let it rest.  This applies to all meat.

I ate this chicken with a side that deserves its own post- couscous with peas and mint.  It was almost better than the chicken.  I’ll post the recipe later. Stay tuned.

Chicken n’ Dumplings

Chicken and Dumplings is one of my all time favorite comfort foods. With the weather windy and wet from hurricane Sandy, I needed a comforting dinner I could cuddle up with.  Not only did this hit the spot, it made the apartment smell wonderful.  I ate it for lunch and dinner for the next 3 days.

This recipe starts by making a chicken stock.  Homemade chicken stock is significantly better than canned. It’s always been on my list to make a lot of and freeze but I’ve never done it.

I placed a whole 3 1/2 pound chicken in a dutch oven with a clove of garlic (cut horizontally), 6 sprigs of thyme, 4-5 whole black peppercorn, 2 tbs of salt, and 2 bay leafs.  I added filtered water until the chicken was just submerged. I brought it to a boil and then let simmer for an hour.  Nastiness will start to pile up on the top- just spoon it out and throw it away.

While the stock was cooking, I made the biscuits.  These aren’t just plain old biscuits they are fancy chive-buttermilk biscuits.  Start by sifting the dry ingredients together-2 cups all-purpose flour, 1 tablespoon baking powder, 1 teaspoon salt.  Then mix the wet ingredients together- 2 eggs, 1/4 cup chopped chives, 3/4 to 1 cup buttermilk. It will be wet and sticky. 

I was pleasantly surprised when the recipe said to shred the chicken from the stock to use later in the recipe. In the process of making the stock, the flavor is all sucked out of the chicken and most dishes say to throw away the chicken and use shredded roasted chicken breasts.  It always seemed like such a waste.  I don’t think using the already cooked chicken took away from the dish though. 

After an hour your stock will be nice and flavorful, take out your chicken and pull it. Then drain the stock through a strainer to pick out all the leftover pieces. 
Heat 2 tbs of butter and 2 tbs of oil in your dutch oven.  Add in your chopped veggies – 2 carrots, diced 2 stalks celery, diced, 2 cloves garlic, minced, and 2 bay leaves. Let these saute for about 5 minutes.  Then you’ll be ready to make your roux- add a 1/4 c of flour. 

Stir around for about 2 minutes so the starchy taste is removed.  Then start adding 6 cups of your stock 1 cup at a time while stirring constantly.   Then add in 1 cup of frozen peas and 1 cup of frozen pearl onions (Don’t skip the pearl onions- they really make the dish).  Let the sauce simmer for about 20 minutes until it thickens.  Then add in the shredded chicken and 1/4 cup of heavy cream.

Now comes the fun part!  Bring your soup to a simmer.  Make little (they will multiply in size) balls out of the dough.  It will be very sticky.  Drop them into your soup.  They should cover the top of your soup but don’t crowd them.   

 Let these simmer for about 15 minutes and the viola! you  have a delicious dish.


Here’s the full recipe: http://www.foodnetwork.com/recipes/tyler-florence/chicken-and-dumplings-recipe2/index.html 

Weekend Lobster Dinner

One of the perks of living by the ocean is fresh seafood.  My Dad is a great scuba diver and while I was visiting last weekend, he caught some AWESOME lobsters.  It doesn’t get fresher than eating seafood the day it’s caught and the fresh difference is very evident.  My parents and I whipped up quite the feast.

Here’s what was on the menu:

Roasted beet, goat cheese, and arugula salad
Grilled lobster tails
Green beans with pancetta
Shells and Cheese 

Roasted beets are all the rage right now. I haven’t been to a nice restaurant in the past few months that doesn’t feature a beet dish of some kind.  My idea of beets were Nangie’s canned pickled beets that  were….. not one of her best dishes.  They just never did much for me.  Roasting the beet though gives it a whole new life!

You start by tossing the beets in a balsamic vinaigrette- 1/4 cup balsamic vinegar, 3 tablespoons thinly sliced shallots, 1 tablespoon honey, 1/3 cup extra-virgin olive oil, Salt and pepper

Reserve the left over vinaigrette. Roast them at 400 degrees for 45 minutes.

Then all you have to do is assemble the salad!  Arugula, chopped avocado, goat cheese, and the beats. Drizzle on the reserved vinaigrette. The different textures and tastes in this salad are really amazing.

My dad prepped the lobster. Since it’s so good by itself, there’s no need for lots of spices, sauces, blah blah.  Just some salt an pepper and a hot grill for about 10 minutes.  Don’t overcook!

The green beans were flavorful as well.  I chopped up some pancetta and sautéed it until it was nice a crispy.  I steamed the green beans and then threw them in the pan with the pancetta. 
I don’t have a picture of the mac and cheese :/ but here’s the recipe I use. I don’t do the tomato and breadcrumb topping.  It’s a great recipe. My only beef with it that the leftovers aren’t very good.   http://www.foodnetwork.com/recipes/ina-garten/mac-and-cheese-recipe2/index.html

Tomato Soup with Grilled Cheese Croutons

Ina (as in Ina Garten- the creator of the most wonderfully, foolproof recipes. ever.) is realeasing a new cookbook at the end of the month which I have been actively counting down the days until I get to carefully page through it, read every word, and cook every recipe. This recipe was pre-released and I couldn’t help but give it a go.  The cookbook is called “Foolproof: Recipes you can trust” and this one rang true.  It’s a light, easy dinner that warmed my insides and tasted delicious.

I’ve found the secret to any tomato based dish:

San Marzano Tomatoes.

This isn’t a brand. It’s a TYPE of tomato.  They look as pictured on the can- long and thin.  The flesh of these tomatoes is much thicker with fewer seeds, and the taste is stronger, more sweet and less acidic.

The less acidic part is particularly important because no one wants an acidic sauce.

So this recipe calls for crushed tomatoes but whole foods only had san marzano tomatoes in whole form (imagine that- whole tomatoes at whole foods). No problem- I whipped out my handy dandy food processor.

I heated some olive oil in a dutch oven (taylor only knows this term to have one meaning- we won’t discuss it here) and threw in 3 cups of chopped onions.  I simmered them on low-medium heat until they were brown and soft.  You want to give them a full 20 minutes or they will be too crunchy. At minute 19, throw in 3 cloves of chopped garlic.  At minute 20, put in the tomatoes, 4 cups of chicken broth, 1 tbs of salt (it sounds like a lot but it’s needed), 1 tsp pepper, and a large pinch of saffron.  I’m not sure how much the saffron added. It’s a pretty expensive spice so if it’s not on sale or you don’t have it on hand, don’t worry about it.

Now let this simmer for 15 minutes.  During this time, cook the orzo.  Boil it for 5 minutes in salted water.  It will finish cooking in the soup. Drain it and throw it into the soup.

Here’s where you pour in 1/2 cup of cream.  I forgot about this and didn’t realize it until I wrote this post.  I’m sure it would have made it a lot richer but it was still very good without it.

While the soup was simmering on low, I got the grilled cheese croutons ready. I sliced some french bread in 1/2 inch slices and buttered them (all the way to edges) and toped the non-buttered side with little pieces of gruyere cheese.

Ina used a panini press but I don’t own one (hint: christmas gift). If you are without one as well, heat a pan on medium- not any higher. You want them nice and brown, not black. Place them in the pan and let them brown.

Cut them into halves or fourths.  You can either place them in the soup or serve them along side.

I put on Frank Sinatra pandora, poured myself a glass of red, french wine and flipped through every page of the mega thanksgiving issue of the food network magazine. I highly recommend it.

Here’s the full recipe: http://www.foodnetwork.com/recipes/ina-garten/easy-tomato-soup-grilled-cheese-croutons-recipe/index.html 

Apple Cider Pork Loin with Cumin Parsley Rice

I’ve made this pork loin every fall since I was in 7th grade.  It’s my absolute favorite way to do pork loin. Its a wonderful start to fall and a great dish for a crowd of people.  I had the wonderful opportunity of cooking for 5 friends a few weekends ago while I was in Philly and I couldn’t think of a better dish to prepare.  Taylor (my amazingly wonderful man-of-my-dreams boyfriend) and I went to a small farm outside of philadelphia to pick pumpkins and much to my liking they had a farmers market that had fresh meat raised on their farm.  The pork loins were absolutely beautiful.  They had a deep red color that just screamed flavor.

He’s absolutely beautiful too 😉

And we’re beautiful together!

Back to food…

I apologize for my lack of pictures.. I was concentrating on how delicious the food was going to be.

This pork in marinated in apple cider then covered in a brown sugar, mustard pecan rub.  YUM!

Start by marinating the pork loin in apple cider.  Put the pork in a zip lock back or casserole dish and cover it with the apple cider.  Marinate it for 6-8 hours. I started marinating when I woke up and it was perfect by dinner time.

Take the pork out and throw away the apple cider.  Get your rub together- garlic, brown sugar, and mustard.  Generously rub this all over the pork loins.  Then roll them in chopped pecans.  Roast at 450 until it reaches 145 degrees about 30 minutes. Cover with foil and let it rest for 15 minutes.

The rice is easy!  Cook 2 cups of white rice with 2 can of chicken broth and 1/2 cup of water.  Then mix in the parsley, cumin, and pecans  I’m not a huge cumin fan but it’s absolutely amazing in this rice.

I sautéed some apples in butter and apple cider and topped the pork with it. Serve all together and enjoy!!

Here’s the recipe–

serves 6

2 cups apple cider
2 pounds pork
1/2 cup brown sugar
2 tbs spicy brown mustard
4 garlic cloves, minced
1 1/3 cup chopped pecans
Cooking Spray

Cover the pork with apple cider and marinate for 6-8 hours.  Discard Marinade.  Preheat oven to 450 degrees. Combine brown sugar, mustard, and garlic. Rub over pork. Roll pork in pecans until covered.  Roast on a broiler pan for 30 minutes or until pork reaches 145 degrees.

While the pork is cooking, make the rice.

2 cups rice
2- 14 oz cans chicken broth
1/2 cup water
2/3 cups of parsley
2 tbs. of butter
Salt and Pepper to taste
1 teaspoon Cumin

Bring water, chicken broth, and rice to a boil. Cover and turn heat on the lowest setting.  After 20-30 minutes the rice will be done.  Mix in the remaining ingredients.

Pumpkin Zucchini Bread

Fall is here. Well, fall is everywhere else but Florida. It still feels like the dead of summer but if you turn up the air conditioning and light a pumpkin candle you can pretend.  I LOVE pumpkin anything- pumpkin ravioli, pumpkin coffee, pumpkin pancakes, pumpkin cupcakes (I had 3 at work today :/) but my favorite is pumpkin bread! I decided to mix it with my other favorite sweet bread, zucchini bread.  It tastes just like fall.

I started by mixing the wet ingredients-

  • 3 eggs, lightly beaten
  • 2 cups sugar
  • 1 cup canned pumpkin
  • 1 cup butter, melted
  • 1 tablespoon vanilla extract

Then I mixed the dry ingredients-

  • 3 cups all-purpose flour
  • 1 teaspoon baking soda
  • 1/2 teaspoon baking powder
  • 1/2 teaspoon salt
  • 1/2 teaspoon ground cinnamon 
  • 1/2 teaspoon ground nutmeg
  • 1/2 teaspoon ground cloves

Then combine them all together.

Then shred 1 cup of zucchini and add that in.

Take a moment here and eat some of the mix.  It’s fabulous. I almost like it better in this state than when it’s bread.

 Grease 2 bread pans with some butter. Don’t skip- you’ll regret it later.
Butter does wonders for your hands.  It’s the ultimate moisturizer.

Pour half of the mixture into each pan

Now throw them in the oven at 350 degrees for 45-50 minutes.
If you stick a toothpick in the middle and it comes out clean, it’s finished baking.

Yum!  Let them cool (if you can wait).  Wrap them nice and tightly in plastic wrap and keep them out on the counter.
They will go dry if they are put in the refrigerator.

Eat one yourself and give another to a friend.

The lucky receiver of my second loaf is my friend and faithful blog reader……..

DARREN MCGUIRE!!

Fruit Tarts

Yum.  These fruit tarts are creamy, sweet, all-natural, and fresh.  They take about 2 hours to make so I wouldn’t classify this as quick and easy but the taste is worth the work.  They can be topped with any type of fruit. I chose strawberries and my roommate, Scott, chose bananas.

I saw fruit tarts at a french bakery in Winter Park, FL and knew I had to go home and try to make some myself.  I ventured over to Williams Sonoma’s and got these cute, 4-inch tart dishes.

There are 3 parts to this recipe- 1) The crust 2) The filling and 3) The assembly

1) The crust-

As with any pastry crust, the colder the better. Start with combining 1 1/4 cup of flour, 3 tbs of sugar, 1/2 tsp of salt.  Place this mixture in the freezer for 30 minutes so it’s nice and freezing.  Pour the flour mixture into the bowl of a food processor with a blade attachment.  Drop in 8 tbs of very cold butter cut into tablespoons. Pulse it until the butter is in small pea-size pieces.  Drizzle in 1/4 cup of ice cold water and pulse again until it comes together in a dough ball.

Place the dough on a floured surface and form into a disk.  Then wrap it in plastic and put it in the refrigerator for 30 minutes.

While the dough is in the fridge move on to the second stage.

2) The Filling

Here’s all that goes into it:

5 extra-large egg yolks, room temperature
3/4 cup sugar
3 tablespoons cornstarch
1 1/2 cups scalded milk (Milk heated to 180 degrees, just on the edge of boiling)
1/2 teaspoon pure vanilla extract
1 teaspoon Cognac (I buy the little airplane sized bottle)
1 tablespoon unsalted butter
1 tablespoon heavy cream

Beat the egg yolks and sugar on medium-high speed for 4 minutes with an electric mixer.  It’ll will get very thick., Reduce to low speed, and add the cornstarch.

With the mixer still on low, slowly pour the hot milk into the egg mixture. Now, Pour the mixture into a medium saucepan and cook over low heat, stirring constantly with a wooden spoon, until the mixture thickens, 5 to 7 minutes.

Don’t be alarmed when the custard comes to a boil and appears to curdle; switch to a whisk and beat vigorously. Don’t worry, it will be ok. I promise.

Cook, whisking constantly, for another 2 minutes. The custard will start to become pudding.

Stir in the vanilla, Cognac, butter, and heavy cream. Pour the custard through a sieve into a bowl. Place plastic wrap directly on the custard and refrigerate until cold.

Now that the filling is chilling, go back to step one and pull your dough out the fridge.

Roll out the dough to be about 1/4 of an inch thick.  Cut out circles of the dough that are a little bit bigger than your tart shells. Place it into your tart shell and press ( not stretch) the dough into the shell.

Once the dough is in the shell, roll your rolling pin over the top to cut off the excess.  

Now do it for the rest of them! What fun!
Aren’t they adorable?
Now butter some foil squares and put the foil butter side down into the shells.
Put something like beans or rice on top of the shells.  This will keep the bottoms from rising while they bake.
Throw them in the oven at 375 degrees for 10 minutes.  Then take out the foil and beans and cook them for another 15 minutes.  If they are getting too brown, place a piece of foil loosely over the top.
You’re almost finished!
3) The assembly:
Cut up the fruit you want to use.  Try to cut them in flatter pieces so they will lay nicely on the tart.  Spoon the cool custard into the tart shells and then decorate with the fruit.
Voila! Enjoy!